

Design of your LMS
User Interface (UI)
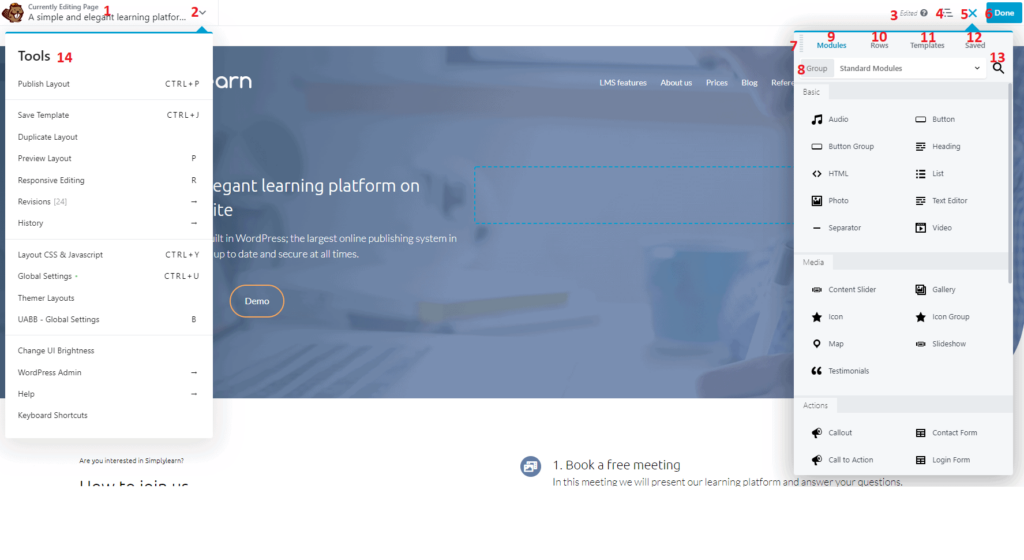
When you open a page in page builder for the first time, you should be taken through a tour showing you the different features there are. This tour can also be taken later, by clicking on Help in the Tools menu, and then click on Take a Tour. Other than this, here’s what you’ll see when starting the page builder:
#1-6 Top bar
The following numbers correspond to the screenshot above.
1. Title bar
Shows what you are editing (page, post, etc.) and its title.
2. Arrow to expand the Tools menu
3. Editing status
Here you will see the status of the current webpage. It will show Saving… and Saved whenever you make changes, and Edited if there are any changes you haven’t published. If you haven’t made any changes, this area will be blank.
4. Outline panel
Here you can se the layout structure of your page.
5. Content panel show/hide icon
This will only appear if you haven’t pinned the content panel to one of the sides (look at #7 Drag handle for more info.
6. Done button
This button displays differently depending on whether you’ve made changes or not:
- If you haven’t made changes, the button is gray, and you can exit the page builder by clicking it once.
- If you have made changes, the button is blue. Once you click on it, you will then have the options to Discard, Save draft, Publish, or Cancel.

#7-13 Content panel
The numbers correspond to those in the screenshot at the top of the page.
7. Drag handle
If you click and hold the left mouse button on this icon, you can either drag it anywhere on the screen, or you can pin the panel to one of the sides by dropping it into one of the blue vertical strips that appear. You can unpin the panel by grabbing the top and drag it back to the center.
8. Group selection within the tab
Each tab (look at #9-12 for more details) is organised into groups. This box is to navigate between the different groups within the selected tab.
9. Modules tab
This is where you add the content of your page. The tab has three standard subgroups, but there may also be other groups available, if you have other plugins installed:
- Standard (built-in) modules
- WordPress widgets that can be used as modules
- Saved modules, organized under each module type.
10. Rows tab
With Rows, you can split your page into different vertical sections, where you can add modules beside each other, instead of the normal below. This tab contains the following groups:
- Column layouts
- Prebuilt rows
- Saved columns
- Saved rows
11. Templates tab
This tab displays the built-in layout templates (landing pages and content pages), plus any saved layout templates. Click on any template to insert it into your layout.
12. Saved tab
Displays all your saved items grouped into rows, columns, and modules.
13. Search icon
This only works when the Modules tab is selected, and can be used to search for different modules.
#14 Tools menu
Here you can find different options as for example publishing, previewing and responsive editing, as well as settings, help and keyboard shortcuts.